St. Patrick’s Day Table Decorations That Wow Every Guest
St. Patrick’s Day table decorations don’t have to break the bank or take hours to set up. From budget-friendly shamrock centerpieces to kid-friendly DIY projects, these simple ideas will transform your dining table into a festive green haven that celebrates Irish charm without the stress.

Homemaker Highlights
AFFILIATE DISCLOSURE: Some of the links below are affiliate links. This means that, at no additional cost to you, I will earn a small commission if you click through the link and finalize a purchase. Read the full disclosure policy here.
St. Patrick’s Day Table Decorations
Over the years, I’ve learned that creating a beautiful St. Patrick’s Day table doesn’t mean covering every surface in shamrocks or spending your grocery budget on decorations. It’s about mixing a few festive touches with things you already own, keeping it simple enough that you can actually enjoy the day, and maybe sneaking in a little Irish magic without going overboard.
So grab your Irish breakfast tea (or maybe a green smoothie), and let’s talk about creating St. Patrick’s Day table decorations that feel special without the stress.
Why St. Patrick’s Day Table Decorating Is Worth the Effort
I know what you’re thinking – “Do I really need to decorate for St. Patrick’s Day?” And honestly, you don’t need to do anything. But here’s what I’ve found: taking 20-30 minutes to add some festive touches to your table creates such a fun atmosphere, especially if you have kids. It turns a regular Tuesday dinner into something memorable, and it gives everyone an excuse to wear their green shirts and celebrate together.
Plus, St. Patrick’s Day falls right in that weird mid-March period when winter feels endless and spring seems impossibly far away. A little green on your table is like a promise that warmer days are coming!
💡 PRO TIP: Start collecting St. Patrick’s Day decorations the day after the holiday when everything goes on clearance, watching especially for items that can also be used day-to-day or during other seasons. (Christmas clearance items in green are great to source for St. Pat’s season!)
The Budget-Friendly Foundation: What You Actually Need
Before we get into the fun stuff, let’s talk about the basics. You don’t need to buy a whole new set of dishes or fancy linens. Here’s my tried-and-true approach to budget-friendly holiday decorating that works for any celebration:
Start with what you have
These are items you either use everyday or even things collected for other holidays and seasons. Plus these items tend to be super cheap at yard sales and thrift stores, especially if you’re willing to mix and match patterns and colors.
- White plates
- Simple glassware
- Your everyday table runner or placemats
- Regular silverware
Add strategic pops of green and gold
It doesn’t take much, and these things can also be reused or can even be sourced from nature and returned to the compost bin after!
- Green napkins ($5-8 for a pack of 4 cloth napkins)
- Gold chargers or placemats ($10-15 for a set of 4)
- Small shamrock decorations ($3-8 for a pack)
- Fresh flowers or greenery from your yard (FREE!)

Creating a Centerpiece That Won’t Fall Apart Mid-Dinner
Simple and easy are always best I think! Here are some options that even I, the non-crafty gal, can do in just a few minutes:
The Fresh Flower Method
Grab a simple clear vase and fill it with white flowers (carnations, daisies, or even grocery store bouquets work perfectly). Add a few sprigs of greenery from your yard – eucalyptus, ferns, or even fresh herbs like rosemary look beautiful and smell amazing. Tie a green ribbon around the vase, and you’re done!
Cost: $8-12 for flowers, everything else is free
The Three-Pot Approach
This is my current favorite! Get three small terracotta pots (the 4-inch size), paint them with green acrylic paint (let the kids help!), and plant them with:
- Fresh herbs like parsley or basil
- Small succulents
- White or yellow pansies
Arrange them down the center of your table on a simple runner. After St. Patrick’s Day, you can use the herbs for cooking or transplant everything to your garden!
Cost: $10-15 total, and you get plants you can use later
💡 PRO TIP: If you’re painting pots with kids, do it outside on old newspaper and embrace the messy reality. Your finished pots may have fingerprints and weird drip marks, but that’s what makes them special. Perfectionism is the enemy of fun family projects!

The Color Palette: Beyond Basic Green
Here’s something nobody tells you about St. Patrick’s Day decorating – you don’t have to use bright Kelly green for everything! In fact, mixing different shades creates a much more sophisticated look that doesn’t scream “elementary school classroom.”
My go-to color combinations:
- Sage green + cream + gold: Super elegant and calming
- Forest green + white + natural wood: Fresh and modern
- Emerald green + copper + ivory: Rich and unexpected
- Mint green + soft pink + gold: Perfect if you want something a little different
I learned this from watching way too many decorating tutorials on YouTube, but honestly, it made such a difference. Our table went from looking like a St. Patrick’s Day party store to actually feeling special and put-together.
Setting the Table: Layer by Layer
Okay, this is where it all comes together! Let me walk you through exactly how I set our table, step by step:
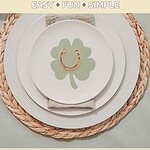
Layer 1 — The Base: Start with your regular tablecloth or leave the table bare if you have a pretty wood surface. I use a khaki table runner that has green leaves and white flowers that I got at Walmart.
Layer 2 — The Plates: Place your white dinner plates at each setting. If you have gold or brass chargers, put those underneath – but don’t buy these just for one holiday!
Layer 3 — The Napkins: This is where you add your main pop of color. Fold green napkins (cloth or even nice paper napkins work!) and place them on the plates. I love the simple rectangle fold because it’s quick and doesn’t fall apart when people pick them up.
Layer 4 — The Details: Add a small shamrock decoration on top of each napkin, or tie napkins with gold ribbon. (I save the same ribbon to use from year to year!)
💡 PRO TIP: Don’t overthink the napkin fold! I wasted so much time trying to create fancy napkins from Pinterest tutorials. A simple fold looks elegant and won’t frustrate you before dinner even starts.

Kid-Friendly Table Additions (Because They’re Part of This Too!)
If you have kids, you know that fancy table decorations and small children don’t always mix well. Here’ are some ideas to St. Patrick’s Day table kid-friendly without sacrificing the festive feel.
Individual “Leprechaun Traps”
Give each kid a small jar or cup filled with gold-wrapped chocolate coins at their place setting. Tell them it’s to “catch leprechauns” but really it’s just a fun treat that keeps little hands busy while you’re finishing up dinner prep. Plus, it gives them something to look forward to at the table!
Coloring Sheet Placemats
Print out free St. Patrick’s Day coloring sheets and laminate them (or just put them in page protectors). These become personalized placemats that kids can color with dry-erase markers while waiting for dinner. Check out free printable resources that you can use year after year.
The Activity Centerpiece
Instead of flowers in the center, you can also set out a shallow basket with St. Patrick’s Day themed items the kids can play with – small shamrock erasers, gold coins, mini rainbow toys. It’s contained chaos, which is the best we can hope for, right?
DIY Decorations That Don’t Require Craft Store Runs
Make a pact with yourself that you won’t run out to the craft store for supplies for a specific decoration idea this year! Instead, set your mind to creating decorations from things you already have around the house.
Paper Shamrock Garland
Trace shamrock shapes on green cardstock or old green paper (I’ve used wrapping paper scraps!), cut them out, and string them together with twine. Hang it from your chandelier or across the back of chairs. It takes maybe 15 minutes and costs nothing if you use paper you already have.
Mason Jar Votives
Paint the outside of small mason jars with green glass paint (one small bottle is about $4 and lasts forever). Pop tea lights inside for a soft, festive glow. These look especially pretty as the sun sets during dinner.
Painted Rainbow Rocks
This is a hit with kids! Collect smooth rocks from outside, wash them, and paint them like rainbows using acrylic paints. Scatter them down the center of your table as a runner. After St. Patrick’s Day, the kids can take them to their rooms or give them as gifts.
💡 PRO TIP: Keep a “craft supplies” bin with basic items like cardstock, ribbon, paint, and scissors. I stock mine after holidays when everything’s on clearance. It saves so much time and money when you need to throw together last-minute decorations! It also does double duty as a kids’ craft supply bin when needed.

The Menu Touches: Making Food Part of the Decor
I’m not suggesting you dye everything green (though we’ve definitely done green pancakes before!), but there are simple ways to make your food feel festive.
These are easy ways to incorporate everyday foods and serving dishes into the table setting:
- Serve drinks in clear glasses with green straws
- Use white serving dishes on green trivets or placemats
- Add fresh parsley as garnish (it’s green AND delicious)
- Set out butter shaped with shamrock cookie cutters
- Serve a simple cabbage dish in a pretty bowl
Speaking of cabbage, if you’re making traditional Irish-inspired foods, check out tested recipes from reliable sources that’ll actually turn out well. I learned this the hard way after several dry, crumbly soda bread attempts!
The food doesn’t have to be complicated. Honestly, the most successful St. Patrick’s Day we had was when I made a big pot of vegetable soup, served it with brown bread, and focused on making the table look pretty instead of stressing over an elaborate menu.
Quick-Setup Solutions for Last-Minute Decorating
Life happens. Sometimes you remember St. Patrick’s Day is tomorrow at 9 PM the night before. Here’s my emergency 15-minute table decorating plan:
- Scatter fresh greenery down the center (raid your houseplants if needed!)
- Add tea lights in whatever holders you have
- Fold green paper napkins (paper is fine!)
- Place one shamrock decoration per plate (dollar store saves the day)
- Done! Seriously, that’s it.
Nobody will know you threw it together in 15 minutes, I promise. The point is making the effort to mark the day, not achieving Pinterest perfection.

Keeping It Real: What Actually Matters
Here’s what I’ve learned after years of holiday table decorating with two kids, innumerable pets, and a husband who thinks “festive” means wearing a green t-shirt:
The decorations don’t have to be perfect. In fact, the tables I’m most proud of are the ones where the kids helped and left their mark – crooked shamrocks, messy paint, slightly crumpled napkins.
You don’t need to spend a fortune. Our most memorable holidays didn’t even have a budget for decorations. We used what we had, made some paper crafts, and it was perfect.
The goal is creating a moment. When you sit down at that table together, whether it’s covered in gold and green or just has a few shamrock napkins, you’re marking this day as special. That’s what matters.
💡 PRO TIP: Take a photo of your finished table before everyone sits down to eat. These become such sweet memories!
Storage Tips for Next Year
Don’t be like me in year one, shoving everything into a random box and wondering where it all went next March! Here’s my system:
- Get one clear plastic bin labeled “St. Patrick’s Day” (about $8)
- Wrap breakables in tissue paper (save tissue from other packages throughout the year)
- Keep a list taped inside the lid of what’s in the bin so you know what you have
- Store it with your other holiday decorations so you actually remember to use everything
I also take a photo of my favorite table setup and print it to keep in the bin. Next year, I can recreate it easily or use it as inspiration for something new!
Making It Your Own
The beautiful thing about holiday decorating is that there’s no one right way to do it. Maybe you love vintage brass and want everything elegant. Maybe you’re all about the kids’ crafts and cheerful chaos. Maybe you like mixing modern minimalism with just a hint of festive fun.
Our St. Patrick’s Day table has evolved over the years from “more is more” to a simpler, calmer aesthetic that feels more like us. And you know what? Both versions were perfect for where we were at the time.
So take these ideas, mix them with your own style, use what you have, and create something that makes your family smile when they sit down to dinner. That’s really all that matters.
I’d love to hear about your St. Patrick’s Day table decorating adventures! Do you go all out with elaborate centerpieces, or keep it simple with a few green touches? Have you found any budget-friendly decorating hacks that work perfectly? Drop a comment below and let’s share ideas – I’m always looking for new inspiration, and I bet other readers are too!
Pin this post for later!